Here is the detailed requirement & compatibility specification for WRTune. We designed the app to be “plug-and-play” compatible with standard OpenWRT environments.
1. Official Firmware Only 🔗
For maximum stability and feature compatibility, we highly recommend using official OpenWrt releases.
- Recommended Source: OpenWrt Firmware Selector
- Supported Versions: OpenWrt 24.10.x and newer official releases.
- Why Official? Community-built or vendor-modified “OpenWrt-based” firmwares often change internal API paths that WRTune relies on to give you accurate data.
2. Login Philosophy: One Account, Zero Friction 🔗
WRTune follows the official OpenWrt administrative standard.
- Username: Must be
root(Default). - Our Design Choice: You will notice there is no “Username” field on our login screen. This is intentional. In line with our philosophy of Simple & Standard, we follow the default OpenWrt setup where
rootis the master administrator. This removes unnecessary configuration steps and gets you into your dashboard faster.
3. Service Dependencies 🔗
WRTune communicates with your router using the high-performance ubus (Micro Bus Architecture).
- uhttpd / rpcd: These services must be running (they are enabled by default on 99% of OpenWrt installations).
- Network Access: Your phone must be able to reach the router’s IP address. This works perfectly over Local Wi-Fi
Pro-Tip: Preparing your Router 🔗
Before connecting WRTune for the first time, ensure you have set a strong password for your root account via the LuCI web interface or SSH.
Optional: Advanced Features (Statistics & Management IP) 🔗
To unlock the full potential of WRTune (Traffic Statistics, Static IP management & Block Schedule, Hostname editing, and detailed System Health), you need to install a monitoring tool and grant permissions.
1. Access Your Router 🔗
Log in to your router via SSH (e.g., ssh root@192.168.1.1). This is the most secure way to manage your device directly.
2. Install & Configure Statistics Tools 🔗
We use nlbwmon, vnstat, and etherwake — lightweight, industry-standard tools for bandwidth monitoring and Wake on LAN.
# Update package list and install nlbwmon, vnstat & etherwake
apk update
apk add nlbwmon luci-app-nlbwmon vnstat2 vnstati2 luci-app-vnstat2 etherwake

# --- CONFIGURE NLBWMON (PERSISTENT) ---
/etc/init.d/nlbwmon stop
mkdir -p /usr/lib/nlbwmon
uci set nlbwmon.@nlbwmon[0].database_directory='/usr/lib/nlbwmon'
uci set nlbwmon.@nlbwmon[0].commit_interval='24h'
uci set nlbwmon.@nlbwmon[0].generations='3'
uci commit nlbwmon
rm -rf /var/lib/nlbwmon /tmp/lib/nlbwmon
/etc/init.d/nlbwmon enable
/etc/init.d/nlbwmon start

# --- CONFIGURE VNSTAT (PERSISTENT) ---
/etc/init.d/vnstat stop
mkdir -p /usr/lib/vnstat
sed -i 's|;DatabaseDir "/var/lib/vnstat"|DatabaseDir "/usr/lib/vnstat"|' /etc/vnstat.conf
sed -i 's/;SaveInterval 60/SaveInterval 60/' /etc/vnstat.conf
[ -d "/var/lib/vnstat" ] && cp -r /var/lib/vnstat/* /usr/lib/vnstat/ 2>/dev/null
/etc/init.d/vnstat enable
/etc/init.d/vnstat start
Note for older OpenWrt firmware (pre-24.10): If your router still uses
opkg, replaceapkcommands withopkg:opkg update opkg install nlbwmon luci-app-nlbwmon vnstat2 vnstati2 luci-app-vnstat2 etherwakeverify vnstat select correct WAN interface via OpenWRT dashboard (Status > Traffic monitor > Configuration > Monitor Interface)
3. Grant Permissions 🔗
WRTune v2.0 and above — No manual steps required
Starting with WRTune 2.0, the permission setup is fully automated. After installing the monitoring tools above, simply open the WRTune app and you will be greeted with a Permission Required dialog. Tap “Apply Permissions” and the app will securely configure all necessary access rules — no SSH copy-pasting needed.
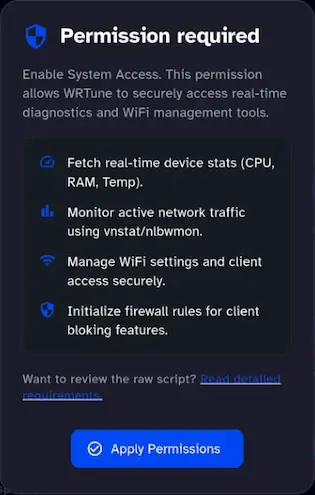
The dialog clearly lists exactly what access is being granted:
- Fetch real-time device stats (CPU, RAM, Temp)
- Monitor active network traffic using vnstat/nlbwmon
- Manage WiFi settings and client access securely
- Initialize firewall rules for client blocking features
Once you tap Apply Permissions, WRTune automatically writes the correct ACL file to your router and restarts rpcd.
4. Re-Login Required 🔗
After applying these changes, Log Out and Log In again in the WRTune app to refresh your permissions. if found any feature still disable, do try re-login again.
Optional: AdGuard Home Integration 🔗
Connect your AdGuard Home instance to manage DNS filtering directly from WRTune.
Prerequisites 🔗
- Active Instance: AdGuard Home running on your network (OpenWRT/Pi). Need help setting this up? Read our guide on Installing AdGuard Home on OpenWrt.
- Credentials: Server URL, Username, and Password.
Setup 🔗
Navigate to Settings > DNS Control > AdGuard Home Server, enter your credentials, and enable the feature.
Features 🔗
- Quick Control: Toggle protection or disable temporarily.
- Insights: View real-time stats, top queried/blocked domains.
- Management: Manage clients, filtering rules, and view query logs.
Note on Service Blocking 🔗
WRTune does not block services itself; it sends requests to your AdGuard Home instance.
If blocking fails, please:
- Inspect your AdGuard Home settings dashboard.
- Test blocking manually in Settings > Client Settings on the AdGuard Home dashboard.
Privacy & Security Guarantee 🔗
- Local Processing: WRTune reads the data generated by your router. All analysis and visualization happen locally on your phone.
- No Cloud: Your traffic data is never sent to external servers or developers.
- Open Source Roots: This feature is built on the official nlbwmon package and vnStat, trusted by the global OpenWrt community.